Integration with iOS
This guide provides detailed technical information on integrating the SDK into an iOS application. Be sure to follow the steps and considerations below for a successful integration.
Step 1: Download the SDK
Download the SDK file here
Once in the link, click on the download button to get the SDK file in compressed format.
Unzip the downloaded file to a location of your choice on your development machine.
Step 2: Integration of the SDK into your project
To integrate the SDK into the application project, follow these technical steps:
Add the SDK .framework file to the application project by dragging and dropping it into the project structure.
Access the commerce settings in the "General" tab and locate the "Frameworks, Libraries, Embedded content" section (the name may vary depending on the Xcode version).
In that section, change the Embed flag of the SDK to "Embed & Sign".
By following these steps, the SDK will be properly integrated into the application project, allowing its functionalities and features to be used in the implementation.
Step 3: Configuration in the display driver
To add functionality to the screen controller that will display the form, the following line of code must be included at the beginning of the file:
import UIKit
import IzipayPayButtonSDK
import RLTMXProfiling
import RLTMXProfilingConnections

class ViewController: UIViewController {}
Step 4: Create the configuration object
To create an object of type ConfigPaymentIzipay with the merchant, order and user data, the following code must be followed:
let config = ConfigPaymentIzipay()

func initializeConfigPayment() -> ConfigPaymentIzipay {

    var config = ConfigPaymentIzipay()

        /*...
            -- ¡Recuerda siempre inicializar cualquier objeto antes de asignarle valores!
            var config = ConfigPaymentIzipay()
        ...*/

        config.enviroment = "TEST"
        config.merchantCode = "<CODIGO DE COMERCIO>"

        config.publicKey = "<public key>"

        config.transactionId = "TEST"
        config.action = "TEST"

        config.order = OrderPaymentIzipay()
        config.order?.orderNumber = "TEST"
        config.order?.amount = "1.00"
        config.order?.currency = "PEN"
        config.order?.processType = "autorize"
        config.order?.payMethod = "card"
        config.order?.merchantBuyerId = "123456"
        //...
        config.billing = BillingPaymentIzipay()
        config.billing?.firstName = "Jose"
        config.billing?.lastName = "Perez"
        config.billing?.email = "jperez@itest.com"
        config.billing?.phoneNumber = "958745896"
        config.billing?.street = "Av. Jorge Chávez 275"
        config.billing?.city = "Lima"
        config.billing?.state = "Lima"

        //...
        config.shipping = ShippingPaymentIzipay()
        config.shipping?.firstName = "Juan"
        config.shipping?.lastName = "Wick"
        config.shipping?.email = "jwickq@izi.com"

        //...
        config.token = TokenPaymentIzipay()
        config.token?.cardToken = cardtoken

        config.appearance = AppearencePaymentIzipay()
        config.appearance?.theme = "green"
        config.appearance?.logo = "URL"
        config.appearance?.formControls =AppearenceControlsPaymentIzipay()
        config.appearance?.formControls?.isAmountLabelVisible = true
        config.appearance?.formControls?.isLangControlVisible = true
        config.appearance?.language = language
        config.appearance?.customTheme = CustomThemePaymentIzipay()

        config.urlIPN = "URL"
}
Always remember to initialize any object before assigning values to it!
For example:
var config = ConfigPaymentIzipay()
Be sure to follow this step for a smooth integration!
In this code, an instance of ConfigPaymentIzipay is created and the corresponding values are assigned to the commerceId, orderId and userId properties. These values must be provided according to the commerce, order and user data in the context of the integration. the user in the context of the integration. Once the config object is created, it can be used to perform the necessary payment and processing operations in the application. processing operations required in the application.
Next, the following code must be added to display the form:
 func showIzipayPaymentResult(configPayment: ConfigPaymentIzipay) {
        let s = UIStoryboard(name: "IziPayment", bundle: Bundle(for: PaymentFormViewController.self))
        let vc = s.instantiateViewController(withIdentifier: "PaymentFormView") as! PaymentFormViewController
        vc.delegate = self
        vc.configPayment = configPayment
        self.present(vc, animated: true, completion: nil)
    }
Display modes
Currently the SDK has two display modes:
- FullScreen Mode
To enable full screen functionality in the SDK, you need to set the appearance.visualSettings.presentationMode field to 'fullScreen'.
Then you simply include the following code to enable the form display in fullscreen mode.
 func showIzipayPaymentResult(configPayment: ConfigPaymentIzipay) {
        // Código anterior de showIzipayPaymentResult ...
        vc.modalPresentationStyle = .fullScreen
        self.present(vc, animated: true, completion: nil)
    }
- Embedded Mode
To enable embedded mode in the SDK, you need to set the appearance.visualSettings.presentationMode field to 'embedded'.
Next, you will need to create a ViewContainer in the ViewController that will host the SDK.
@IBOutlet weak var viewContainer: UIView!
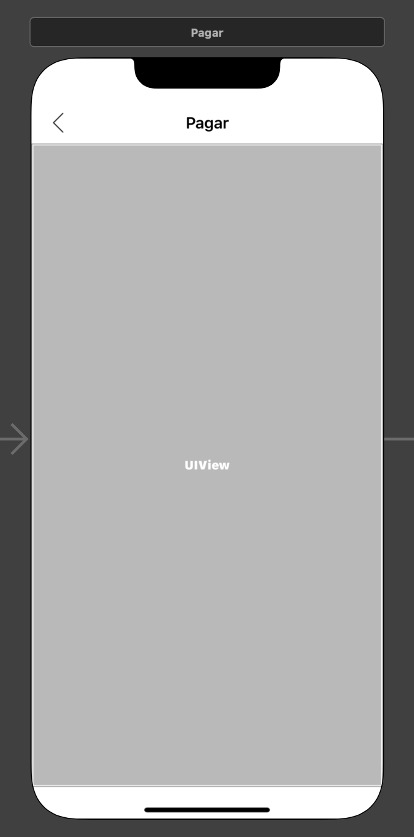
The following image illustrates how this action would be performed when adding a ViewContainer in a ViewController that is embedded in a NavigationController.
Below we show you an example of how to invoke the SDK:
  func showIzipayPaymentEmbedded(){
        let s = UIStoryboard(name: "IziPayment", bundle: Bundle(for: PaymentFormViewController.self))
        let vc = s.instantiateViewController(withIdentifier: "PaymentFormView") as! PaymentFormViewController
        vc.delegate = self
        vc.configPayment = self.configIzipay
        addChild(vc)
        vc.view.frame = viewContainer.bounds
        viewContainer.addSubview(vc.view)
        vc.didMove(toParent: self)
    }
Finally the method is invoked from the viewDidLoad method (which exists in all classes that descend from the UIViewController class)
    override func viewDidLoad() {
        super.viewDidLoad()
        self.showIzipayPaymentResultEmbedded()
    }
This integration step is just an example in the context of using a
ViewControllerembedded in aNavigationController. The key to integration in embedded mode lies in adjusting theshowIzipayPaymentEmbeddedmethod according to specific requirements. It is recommended for use only with advanced iOS knowledge, given the need to understand theViewControllerlifecycles and the transitions between them. transitions between them.It is advised to assign a
viewcontainerthat fills the entire screen width and has a minimum height of 80% of the screen height, considering the vertical orientation. Smaller sizes may cause the SDK to display too small or incorrectly from a visual point of view.
Step 5: Adding delegate methods
To complete the integration, it is necessary to add the IzipayPaymentDelegate delegate methods. In the getPaymentResult method, it is recommended to add an implementation similar to the following:
extension ViewController : IzipayPaymentDelegate {

    func getPaymentResult(_ paymentResult: PaymentResult) {

        //Lectura de respuesta del SDK
        print(paymentResult.code ?? "")
        print(paymentResult.message ?? "")

        if let paymentResultCode = paymentResult.code {
            if paymentResultCode == "00" { 00 codigo operacion autorizada - Revisar listado de codigos de respuesta
                //puede validar los demas valores para garantizar la integridad de los datos
                if let safeResponse = paymentResult.response {
                    //puede validar los demas valores para garantizar la integridad de los datos o simplemente leerlos
                } else {
                    //Si el codigo fue 00 pero el objeto response es nulo, consultar/anular orden
                }
            } else {
                //La operacion no se completo o fue rechazada consultar/anular orden
            }
        } else {
            //Si no hay un codigo de error, consultar/anular orden
        }
    }
}
In this code, the getPaymentResult method is invoked by the Izipay SDK to provide the result of the transaction. Within this method, custom actions can be performed based on the result, such as displaying a confirmation message or processing the received data.
It is important to review the JSON provided in the Use Cases section to understand the structure of the response data and perform a proper reading of it.
In embedded mode, this method also acts as a notification of the final SDK action. It should be used as a starting point for closing the SDK. If you do not close the SDK when executing this method, either by closing the ViewController, removing the ViewContainer that acts as the SDK container, or other similar action, the SDK will remain active.
Regarding the second method, executeProfiling, leave it empty.
The implementation of this method is only done if you want to use the fraud detection feature. For more details on the required steps, see chapter Integration with Cybersource.
func executeProfiling(_ result: IzipayPayButtonSDK.ScoringParams) {

}
Step 6: Add font
If this code is not added, the forms within the SDK will be displayed with simpler text styles.
Add the following code in the AppDelegate in the didFinishLaunchingWithOptions method
    func application(_ application: UIApplication, didFinishLaunchingWithOptions launchOptions: [UIApplication.LaunchOptionsKey: Any]?) -> Bool {
        // Override point for customization after application launch.

        UIFont.registerFontsForIzipayFramework() //Adding fonts to the SDK

        return true
    }
Step 7: Integration with Sensory Branding Libraries
The incorporation of Sensory Branding libraries is a mandatory requirement in the integration process. These libraries are optimized features for iOS optimized for iOS 13 and later versions. However, in case your mobile app is designed for older iOS versions, such as iOS 11 or iOS 12, no drawbacks are anticipated, although the libraries will not run in those cases.
For the sensory branding functionality, first import the libraries into the project:
- Add the MastercardSonic and VisaSensoryBranding libraries to the application project.
- Drag the .xcframework files into the project.
- In the commerce settings, under the General tab, go to the Frameworks, Libraries, Embedded Content (the name of the section may vary depending on the Xcode version) section.
- Change the Embed flag of the libraries to Embed & Sign.
Add the following lines of code in the file where the Izipay SDK call is made.
- Add the following imports.
import IzipayPayButtonSDK
…
import VisaSensoryBranding
import MastercardSonic
- Add the following variable (it is recommended that it be a class variable)
private let sonicManager: MCSonicController = MCSonicController()
Inside the method that creates the configuration object (seen in step 4) add the following lines of code
…
        //Objetos para sensory branding
        let sensoryBrandingVisa = SensoryBranding()
        sensoryBrandingVisa.backdropColor = .white
        sensoryBrandingVisa.isSoundEnabled = true
        sensoryBrandingVisa.isHapticFeedbackEnabled = true
        sensoryBrandingVisa.checkmarkMode = .checkmark

       let sensoryBrandMastercard = MCSonicView()
        sensoryBrandMastercard.background = MCSonicBackground.white

        config.appearance?.sensoryBrand = AppearenceSensoryBrandIzipay()
        config.appearance?.sensoryBrand?.visaSBView = sensoryBrandingVisa
        config.appearance?.sensoryBrand?.mastercardSBView = sensoryBrandMastercard
       …
Add the following implementations in the executeSensoryBrandVisa and executeSensoryBrandMastercard methods of the delegate IzipayPaymentDelegate
  func executeSensoryBrandVisa(view: UIView) {
        if let visaview = view as? SensoryBranding {
            DispatchQueue.main.asyncAfter(deadline: .now() + 1.0) {
                visaview.animate()
            }
        }
    }

    func executeSensoryBrandMastercard(view: UIView, params: MastercardSonicParams) {
        let merchant = MCSonicMerchant(merchantName: params.name, countryCode: params.country,
                                       city: nil, merchantCategoryCodes: [params.mcc], merchantId: nil)
        if let mastercardview = view as? MCSonicView, let safeMerchant = merchant {
            self.sonicManager.prepare(with: .soundAndAnimation, sonicCue: params.sonicCue,
                                      sonicEnvironment: .production, merchant: safeMerchant) { status in
                if status == .success {
                    self.sonicManager.play(with: mastercardview) { MCSonicStatus in
                        print(MCSonicStatus)
                    }
                }
            }
        }
    }
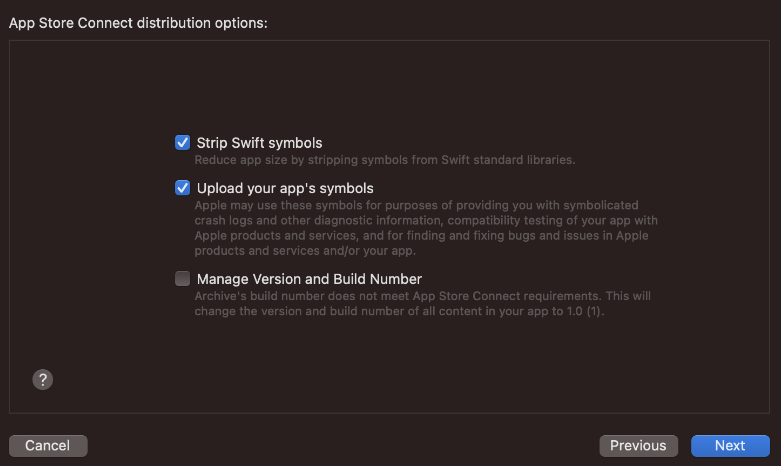
If when testing from Testflight or the App Store you do not see the library animations. Disable the Manage Version and Build Number option when uploading a build to the App Store Connect when uploading a build to App Store Connect.
Step 8: Apple Pay Integration
This step is only applicable only when using Apple Pay. For additional details about Apple Pay, please visit this section.
To use Apple Pay in the Izipay SDK, the following Capability must be added in the project settings (+ Capability button in the image):

When successfully added, the Apple Pay option will be displayed in the Capabilities list.

Once you have made the addition, the system will retrieve a list of merchantId that are linked to your Apple Developer account. You will then need to select the corresponding merchantId in the Izipay merchant portal.
